
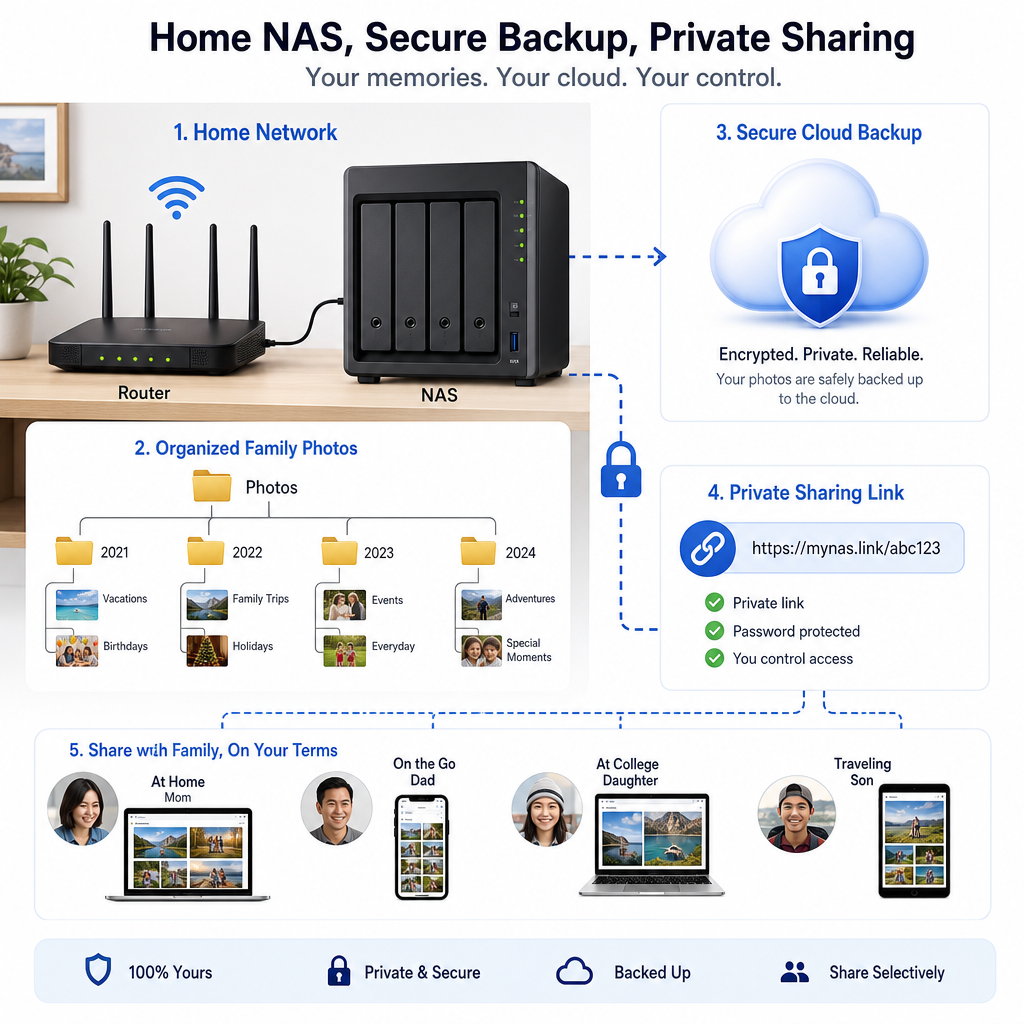
Family photos are precious, so sharing them should be easy without losing control of your files. This guide shows you how to organize photos on a NAS (network-attached storage, a storage box connected to your home network), create a safe cloud copy, and share selected albums with family.
Table of Contents
- Before You Start
- Quick Fix Steps
- Deeper Diagnosis
- Preventive Care
- When to Seek Help
- Frequently Asked Questions
Before You Start
Time: Allow 30–90 minutes for a first setup, plus extra time if you have many photos. Difficulty: Easy to Medium.
- A NAS with enough free space and its power cable.
- A router, the box that creates your home Wi-Fi network.
- A computer or phone connected to your home network.
- A trusted cloud storage account with enough space.
- Strong, unique passwords and two-step sign-in where available.
Decide who should see each album. Use private links or named family accounts for personal photos. Do not make your entire NAS publicly accessible just to share one folder.
Warning: Do not factory-reset the NAS, delete folders, or change advanced network settings until you have a separate backup. A reset or mistaken deletion can permanently remove photos. Download NAS software only from the manufacturer’s official website or your device’s built-in update screen.
Quick Fix Steps
- Connect the NAS safely. Plug it into power and connect it to the router with an Ethernet cable if possible. Wired connections are usually more reliable for large photo transfers.
- Install the official setup app or use the NAS web page. From a computer on your home network, follow the NAS maker’s documented discovery steps. Create an administrator password that is different from your Wi-Fi password.
- Create a family photo folder. Use a simple name such as
Family Photos. Inside it, make folders by year or event, such as2025/Beach Trip. Avoid moving or deleting your original phone photos until the copy is checked. - Copy a small test group. Transfer 10–20 photos first. Open several files from the NAS and compare them with the originals. Check that dates, videos, and full-resolution files work.
- Make a cloud copy. Upload or sync the family folder to your chosen cloud service. Treat synchronization as a convenience, not automatically as a backup: some services copy deletions to every device.
- Share only the album needed. Create a view-only link or invite named family members. Set an expiration date or download limit if the service provides one. Send the link through a private message, not a public post.
Tip: For relatives who are not comfortable with accounts, a view-only album link may be easiest. For sensitive photos, require sign-in and avoid links that anyone can forward.
Windows
Open File Explorer and look under Network for the NAS. If it does not appear, use the NAS app or its local network address as described in the manual. Drag a test folder to the NAS, then open the copied files before transferring everything.
macOS
Open Finder and choose Go > Connect to Server. Enter the NAS address supplied by its setup screen, then sign in. Copy a small test folder and verify it before starting a larger transfer.
iPhone or iPad
Install the NAS maker’s official mobile app, or use the Files app if the NAS supports standard network file sharing. Give the app access only to the photos and folders it needs. Upload a few test items over Wi-Fi before selecting your full library.
Android
Use the NAS maker’s official app or a reputable file manager that supports network storage. Check the app’s permissions before approving them. Upload a small test group, then confirm the files open from the NAS.
Deeper Diagnosis
If the NAS is not visible
- Check that the NAS has power and that its status light looks normal. Check that the router shows a network cable connected.
- Make sure your phone or computer is on your home Wi-Fi, not a guest network. Guest networks often block access to local devices.
- Restart the NAS and router by turning them off, waiting 30 seconds, and turning them back on. Do not press a reset pinhole.
- Open the router’s device list and look for the NAS name. If it has an address such as
192.168.1.25, enter that address only in your home network’s browser setup page or official NAS app.
If uploads are slow or fail
Move the device closer to the router, use a wired computer connection, and keep the screen awake during a phone upload. Check free space on both the NAS and cloud account. Upload in smaller folders and note which folder fails.
If a shared link does not work
Test the link in a private browser window or on a mobile connection. Confirm that the link has not expired, that the folder is shared, and that the recipient has the required sign-in. If the link exposes more than intended, disable it immediately and create a narrower share.
Note: A NAS on your home network is not automatically available while you are away. Remote access requires a properly secured feature from the NAS or cloud service. Avoid opening random router ports or following unverified tutorials.
Preventive Care
- Keep three copies. Keep the working copy on the NAS, a separate backup such as an external drive, and an encrypted cloud copy when possible. Store the external drive away from the NAS.
- Test restores. Every few months, restore a few photos and a video from the NAS and cloud backup. A backup is useful only if it can be recovered.
- Update safely. Apply NAS, router, phone, computer, and cloud-app updates from built-in settings or official sources. Avoid “driver” or “storage cleaner” downloads from pop-up ads.
- Protect accounts. Use a password manager, unique passwords, and two-step sign-in. Remove old family members from shared folders when access is no longer needed.
- Review sharing. Once a month, inspect active links and shared users. Turn off links you no longer need.
Warning: Do not edit the Windows Registry, run unknown commands, or install unofficial NAS firmware to solve a sharing problem. These actions can make the computer or NAS unusable.
When to Seek Help
Contact your internet service provider if all home devices lose internet access, the router repeatedly disconnects, or its warning lights remain abnormal after a restart. Contact the NAS maker if the device shows a disk warning, makes unusual clicking sounds, cannot complete updates, or reports a degraded storage array.
Ask a trusted technician for help before resetting the NAS, replacing a drive, changing remote-access settings, or recovering deleted photos. If photos are irreplaceable, stop writing new files to a failing device and seek professional data recovery advice.
Once your test copy, cloud copy, and private family share all work, you have a practical photo system: local access at home, an off-site copy, and controlled sharing for relatives.
Frequently Asked Questions
Is a NAS a backup?
Not by itself. A NAS is convenient storage, but it can fail, be stolen, or be damaged. Keep a separate external or cloud copy.
Should I use a NAS or cloud storage?
Many families use both. A NAS offers fast local storage and control; cloud storage provides off-site protection and easy sharing.
Can I share my whole photo library?
You can, but sharing selected albums is safer and easier to manage. Use view-only access unless recipients truly need editing rights.
What if my cloud account runs out of space?
Stop the upload, check for duplicate videos, and review storage usage. Do not delete NAS originals until you have confirmed which files are safely stored elsewhere.
Leave a Reply